Did you know your rower can help you recover from a total knee replacement? You don’t need to have full knee flexion to make good use of your rower and reap its health benefits. In this post I’ll give you 4 rowing exercises to do at home to help strengthen your knee and increase your range of motion, whether you’re early on in your recovery or months into rehab.
Benefits of Rowing for TKA Recovery
A total knee replacement (or total knee arthroplasty or TKA), is a common surgical procedure with a high success rate but a long recovery period. Most patients don’t regain full use of their surgical leg until several months after the procedure. But physical activity, including therapeutic exercise, plays a vital role in knee rehabilitation, helping build strength and curb swelling so you can recover faster.
If you’re at the point in your recovery where your doctor has recommended aerobic activity—whether walking, biking, or rowing—then that’s a good sign your rehab is heading in the right direction. As a non-weight-bearing, low-impact activity, rowing in particular offers a host of full-body benefits that you can experience as your knee heals from surgery.
But don’t be too hasty to jump on the rower. One week after surgery you can hardly bend your knee, let alone sit yourself in a rower. It may take several weeks of physical therapy before you’ll have the range of motion or the knee flexion required for rowing.
Whether it’s been 6 weeks or 6 months since surgery, this article is for anyone who has completed their round of physical therapy, has attained a healthy range of motion with manageable pain, or has been given the ok by their doc to start rowing. We’ll start small, ease into the exercises, and ensure nothing hurts or harms your new knee. Always listen to your body and lessen or altogether stop the exercise if it’s causing you pain.
Using a Rower After TKA
For the first two exercises, you’ll use your rower without needing to sit in it just yet. These exercises are helpful wherever you are in recovery, but especially for those still in the first few weeks of rehab.
1. Assisted Heel Slides
This exercise is great for someone still in the early stages of their recovery (first 1–2 weeks). It will help you work on your range of motion, whether you just started physical therapy or just finished.
Position a chair over the back end of the rower, and slide the rower seat so it’s beneath your heel. From here, perform heel slides, an exercise you may recognize as something your PT gave you to do following surgery. Simply slide your heel along the length of the rower, forward and back.
This movement can help you practice moving in and out of full knee extension and become more comfortable in knee flexion. You’ll find that the sliding seat makes this movement easy, smooth, and gradual, and that’s why I recommend it for TKA recovery.
Aim for 20–30 repetitions at a time or set a timer for 1–2 minutes of continuous heel slides. Then take a break and repeat the set 3–4 times a day.
2. Patellar Glides
In a healthy knee, the patella (or kneecap) slides up the knee toward the thigh whenever the leg is straightened. But if you’ve had a TKA or other leg injury, then your kneecap may be too stiff or your thigh muscles too weak to pull the kneecap up naturally. Performing patellar glides can help release stiffness in the knee, freeing it up so the knee can better move through extension and flexion.
To perform a patellar glide, extend your leg and place your fingers beneath your kneecap. Then slowly pull up on your kneecap so it slides towards your thigh. Here’s a closeup of this motion:
You could perform a patellar glide stationary as I show above, but you could also make good use of the sliding feature of your rower. Here’s how that would work:
Assisted Patellar Glide
Sit on a chair situated above the back end of the rower and place your foot on the rower seat below. Perform a patellar glide by pulling your kneecap up towards your thigh as you straighten your leg, gliding the seat of the rower out in front of you. At the terminal point of extension, when your leg is totally straight (or as straight as you can get it), be sure to contract or squeeze your quadriceps.
Although you can perform patellar glides without the rower, the sliding motion provides additional assistance, allowing you to control how slowly and smoothly you extend your leg. This exercise will help you improve knee mobility, relieve stiffness and pain, and recruit your quadricep muscles with each extension.
Shoot for 15–20 reps of these patellar glides or set a timer as before. I’d even recommend performing patellar glides on your nonsurgical leg to help you get a feel for how a healthy kneecap naturally glides. Then repeat the sequence 3–4 times per day.
How to Get Into Your Rower After a TKA
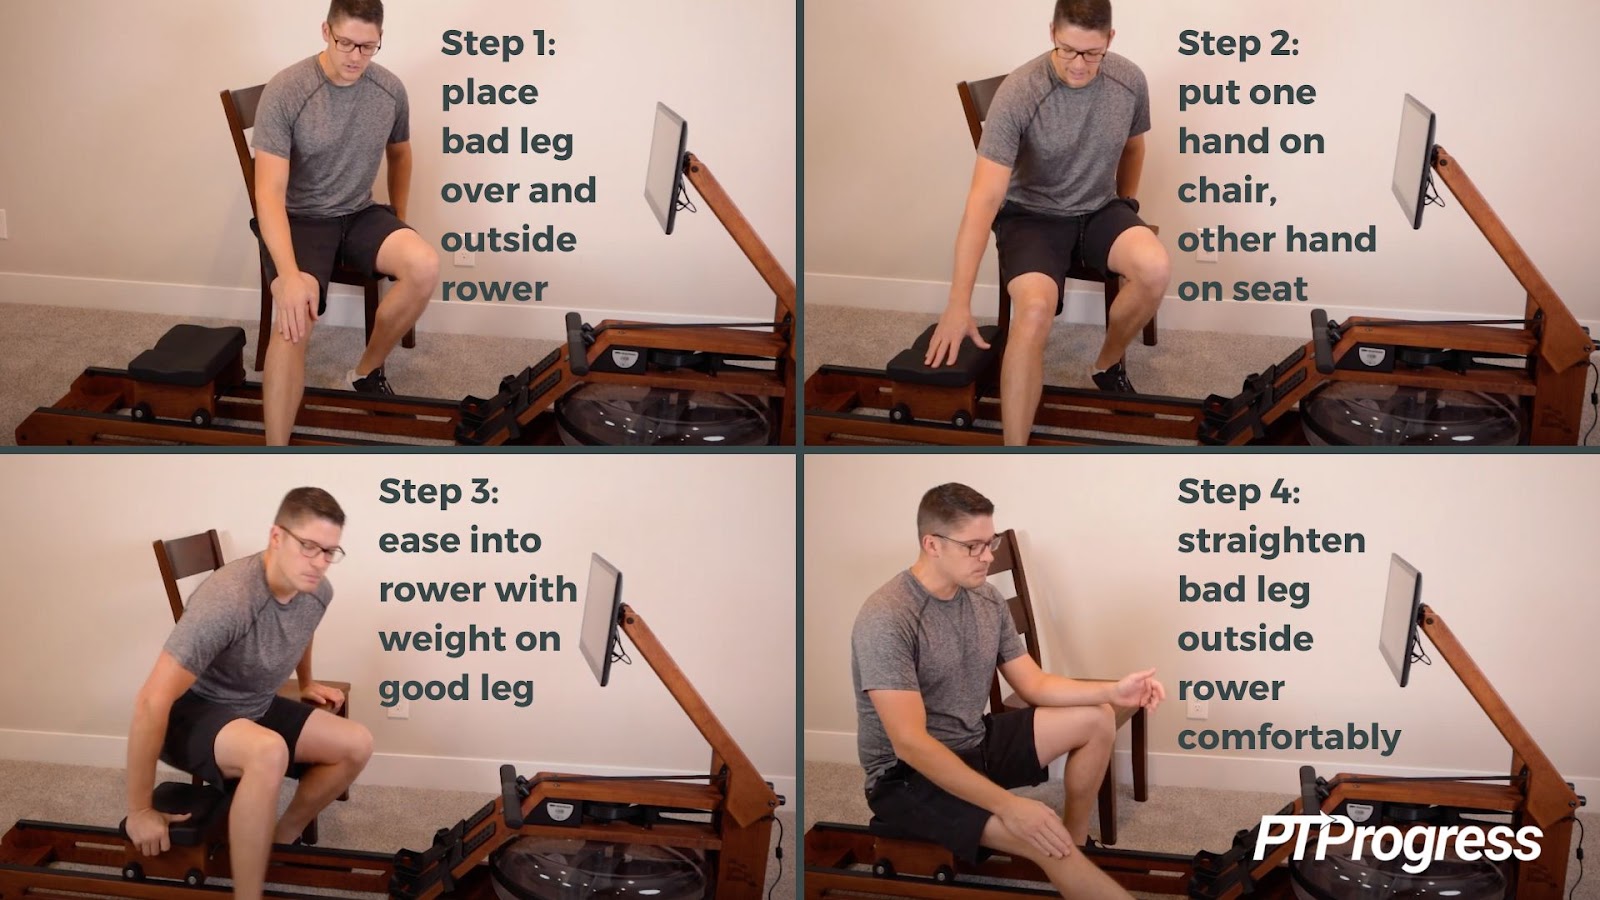
Let’s take a quick pause from exercises and consider—what’s the best way to get into a rower seat if you’re recovering from a TKA? After all, most rowers are fairly low to the ground, requiring a bend of the knee that’s much greater than 90 degrees.
Your sturdy chair will help you here as well. Move the chair alongside the rower next to the seat, on the side of your good leg. Sit in the chair, facing the rower seat, and prop your surgical leg on the other side of the rower. Placing one hand on the rower seat and the other on your chair, push off with your good leg and lower yourself into the rower seat. Try to keep your surgical leg at a comfortable extension as you transition, avoiding any pain.
For the next exercise, sit on the rower with your good leg strapped into the machine and your surgical leg resting outside the rower.
3. One-Leg-Out Modification
Keeping your surgical leg unstrapped and outside the rower will help you control how much that knee bends as you row. Use your good leg, strapped in the rower, to push off for the drive of each stroke, and follow through with the arms as normal. Your surgical leg, straightened outside the rower, will be along for the ride.
In time, however, you should try to start using your surgical leg to push off from the ground and help drive the stroke. Once it starts to feel stronger, inch your foot closer to the rower so that the knee has to bend a little more. You may not be able to bend to 90º or past 90º for a few weeks, but keeping it outside the rower can help modify the severity of that angle.
Once you feel you can bend your knee to a similar degree as your good knee, then strap in your surgical leg and attempt rowing with both legs in the rower. The next step will help smooth that transition.
4. Half-Row Modification
Now that you can strap both legs into the rower, you’re ready to try a half-row. This technique is mostly self-explanatory: instead of returning the handlebar all the way to the front of the rower, you’ll row to the halfway point, before your knees have to pass 90º of flexion.
Keep in mind that you may feel a slight pulling sensation in your knee as it bends and straightens. But you shouldn’t feel sharp pain doing this exercise; if you do, then ease up and stay further back from the front of the rower.
When you’re ready to put the handlebar back, hold it one hand while you use the other to unstrap your surgical leg and shift it outside the rower. Then you can slide up to the top of the machine and return the handlebar without straining your surgical knee.
Adjusting Intensity on your Rower
With the half-row modification, you have total control over how much your knee has to bend for each row. But you can also tweak how much resistance you’ll feel in each stroke, which might make it easier for you to go further. Adjusting the resistance differs based on the type of rower you’re using. A water rower reacts to the speed of your stroke, with a faster stroke meeting more resistance and a slower stroke, less. For an air-resistance rower like the Concept 2, you’ll set the resistance manually through a damper.
I like using a water rower like this one from Ergatta, because I find it provides the smoothest, (quietest!) and most intuitive form of resistance. Read my full review of the Ergatta here.
In this fourth iteration of using a rower for TKA recovery, don’t overdo it. Start out with just 1–2 minutes of half-rowing, gradually increasing your duration every day in increments of 20–30 seconds. Eventually you’ll be able to row for 5, 10, even 15 minutes at a time, improving your cardiovascular endurance, expanding your range of motion, and building muscle strength throughout your body.
Summary: Using a Rower After TKA
Rowing can offer a cornucopia of health benefits, even for someone with knee pain. Whether you’ve recently recovered from a total knee replacement or have already finished your rehabilitation, the above rowing modifications will help you ease back into a healthy level of fitness while minimizing pain and avoiding injury.