A stiff neck is more than an inconvenience; it can cause sharp pain, dull headaches, and limited head mobility all day long. And it can pop out of nowhere—I know just how frustrating it can be to wake up with a stiff neck. I’m a physical therapist (PT), and a couple weeks ago I treated my own neck pain with this simple 5-step routine and experienced fast, long-lasting results within days. Keep reading to learn about my routine and try it for yourself!
Neck Pain: A Quick Medical Disclaimer
Two things: 1) Exercise shouldn’t be painful, and these techniques to get rid of neck pain should not increase your pain. We PTs use the phrase “within a pain-free range” to describe the patient’s own limits with a particular movement. Can’t turn your head as far as you used to without pain? Then just turn it as far as you can for now.
And 2), make sure your neck pain isn’t a symptom of a larger issue, such as a slipped disc. If you feel any numbness and tingling down your arm or hand, consult a physician or PT for an in-person examination.
5 Exercises To Get Rid of Neck Pain at Home
For this routine, I used a special device called the NecksLevel Glide, and I found that it profoundly impacted my success. However, you can also perform these techniques without the device, so I’ll include instructions and photos for both versions. Each exercise is performed lying down, which helps offload the neck muscles and reduce the risk of straining your neck or tensing up in your shoulders.
1. Neck Rotation within a Pain-Free Range
Lie on your back, with your feet flat and knees bent. If you’re using the NecksLevel Glide, position it directly under your head, not under your neck like a pillow. For now do not attach a resistance band to the gliding platform. If you don’t have a Glide device, tuck a hardcover book underneath your head for slight elevation.

From here, turn your head side to side, looking over your shoulder as far as you can within a pain-free range. Rotate just to the point of stiffness, then come out of it before you feel any shooting pain. You may find as you work on neck rotation that your range of motion improves, and you can eventually turn your head further before encountering stiffness and pain.
Keep your head rotations smooth and controlled, alternating sides for 30 seconds.
2. Resisted Neck Rotation
This exercise looks the same as the other, except you will be adding an element of resistance to the head rotations. By making head turning more effortful, you will engage and strengthen the muscles that support the neck, leading to better resilience and less pain down the road. I found that performing 3 sets of these resisted neck rotations helped my neck stiffness disappear in just a couple days!
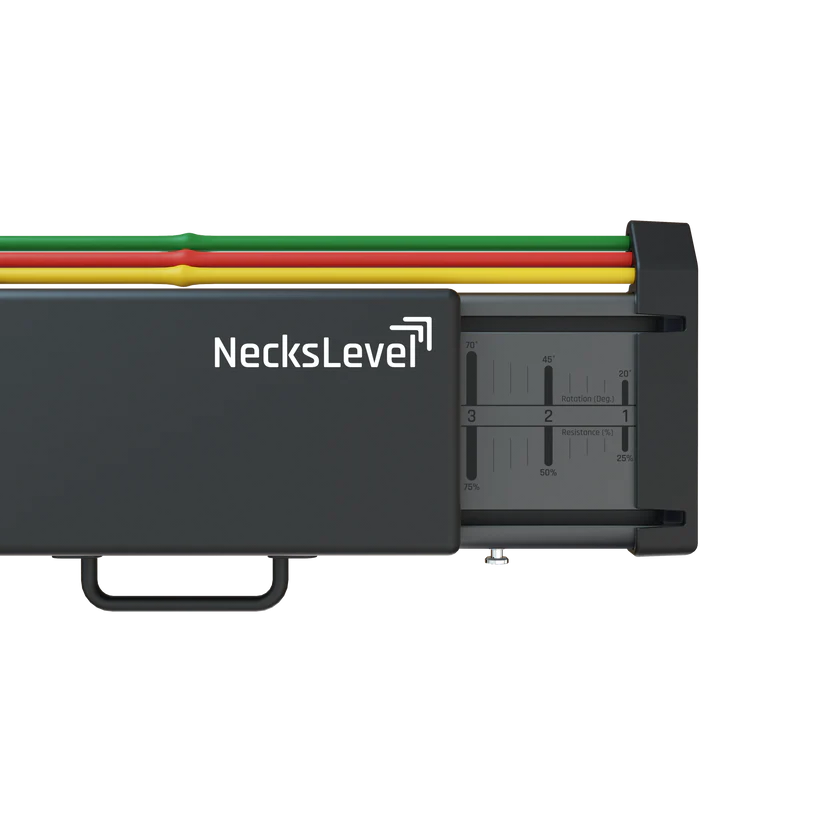
To perform resisted rotations on the NecksLevel Glide, simply snap the lowest band (the yellow one) onto the hook on the platform, center the board under your head, and rotate your neck as before from side to side.
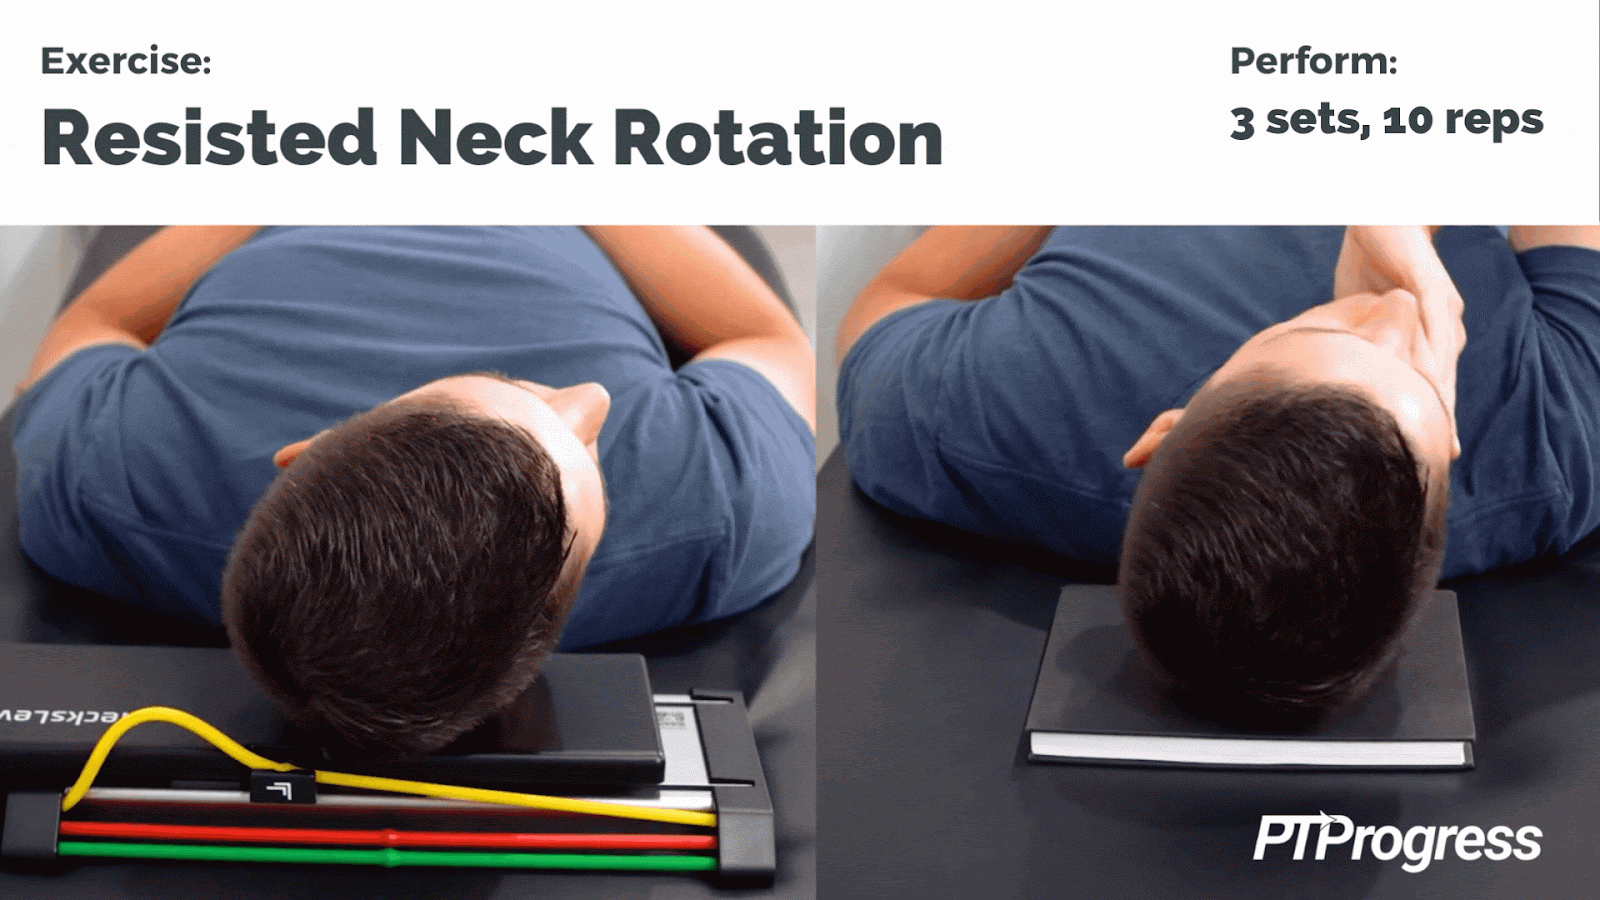
Without the Glide, you can simulate the resistance with your hand. Place your fingertips along your cheekbone and press to resist your head turns in that direction. It’ll make more sense to work on one side at a time when applying resistance by hand.
Although you’ll be working harder to turn your head, it’s important that you maintain smooth rotations. The NecksLevel Glide comes with a textured headband that you could wear to better grip the board and counter the resistance.
When starting out, perform 3 sets of 10 reps each day at the lowest resistance level. You can eventually increase the resistance using the next level band if you’re on the glider.
After these two rotation exercises, you may already feel the routine working, helping your neck muscles both relax and engage through controlled stretching and strengthening. But the next three exercises can bring even more benefits and further your neck-rehab efforts.
3. Isometric Hold
Isometric exercise is anytime you hold one body part still against a resisting force. In this version, you’ll practice keeping your neck still while a form of resistance—your hand or a band—tries to move it to the side.
Lie on your back as before, with the NecksLevel Glide centered under your head lengthwise. Ensure the lightest resistance band is snapped in place on the board, then lift your head and slide the platform over to one side with your hands. Before you let go and it slides back to the central starting point, set your head down to keep the board in place. You will feel the taut band trying to turn your head; resist by contracting your neck muscles, holding for 10 seconds at a time.
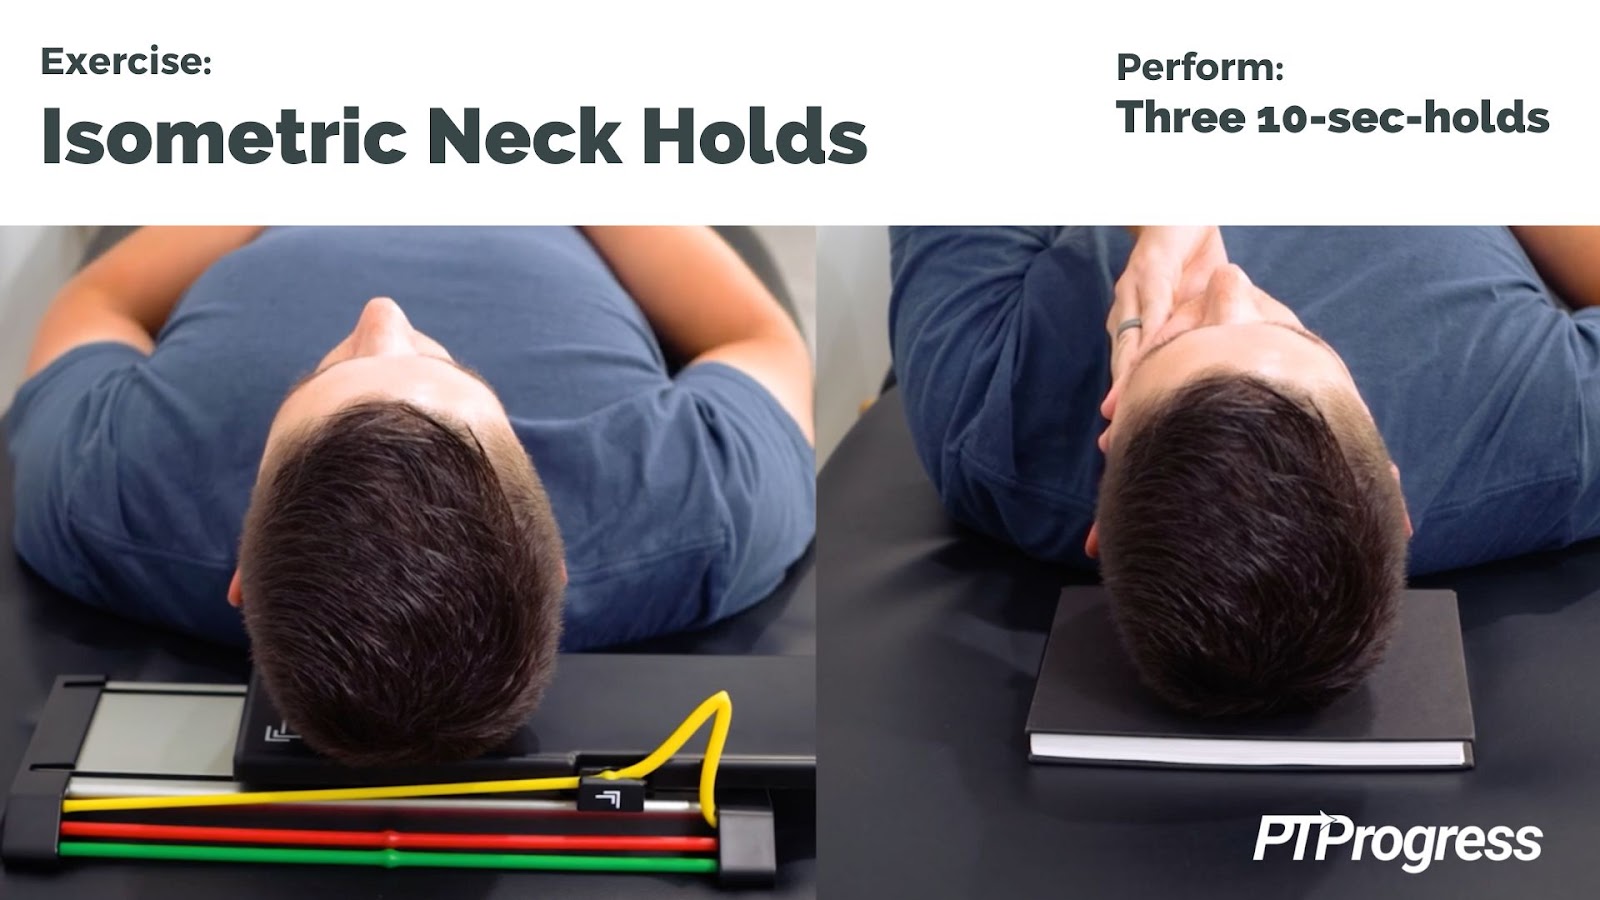
Without a NecksLevel Glide, your hand can play the part of the resisting force. As before, press your fingertips to your cheekbones as if you are trying to turn your head to the side, and counteract that force by pressing your cheek into your hand. Hold for 10 seconds, then release and relax.
Whether you are doing this on a book or on the Glide, be careful not to tense up in your shoulders as you contract your neck muscles, and remember to breathe! Aim to perform 3 separate 10-second holds.
4. Chin Tuck
When done properly, chin tucks can isolate and strengthen the small flexor muscles that stabilize the neck. We use chin tucks in the PT clinic to help correct poor posture as well as to relieve neck pain and stiffness.
Lie on your back as before, with knees bent and feet flat. If you’re using a NecksLevel board, turn it 90º so that the board slides up underneath your head instead of side to side. Without a NecksLevel board, you can simply tuck a rolled-up towel under your neck at the base of your head.
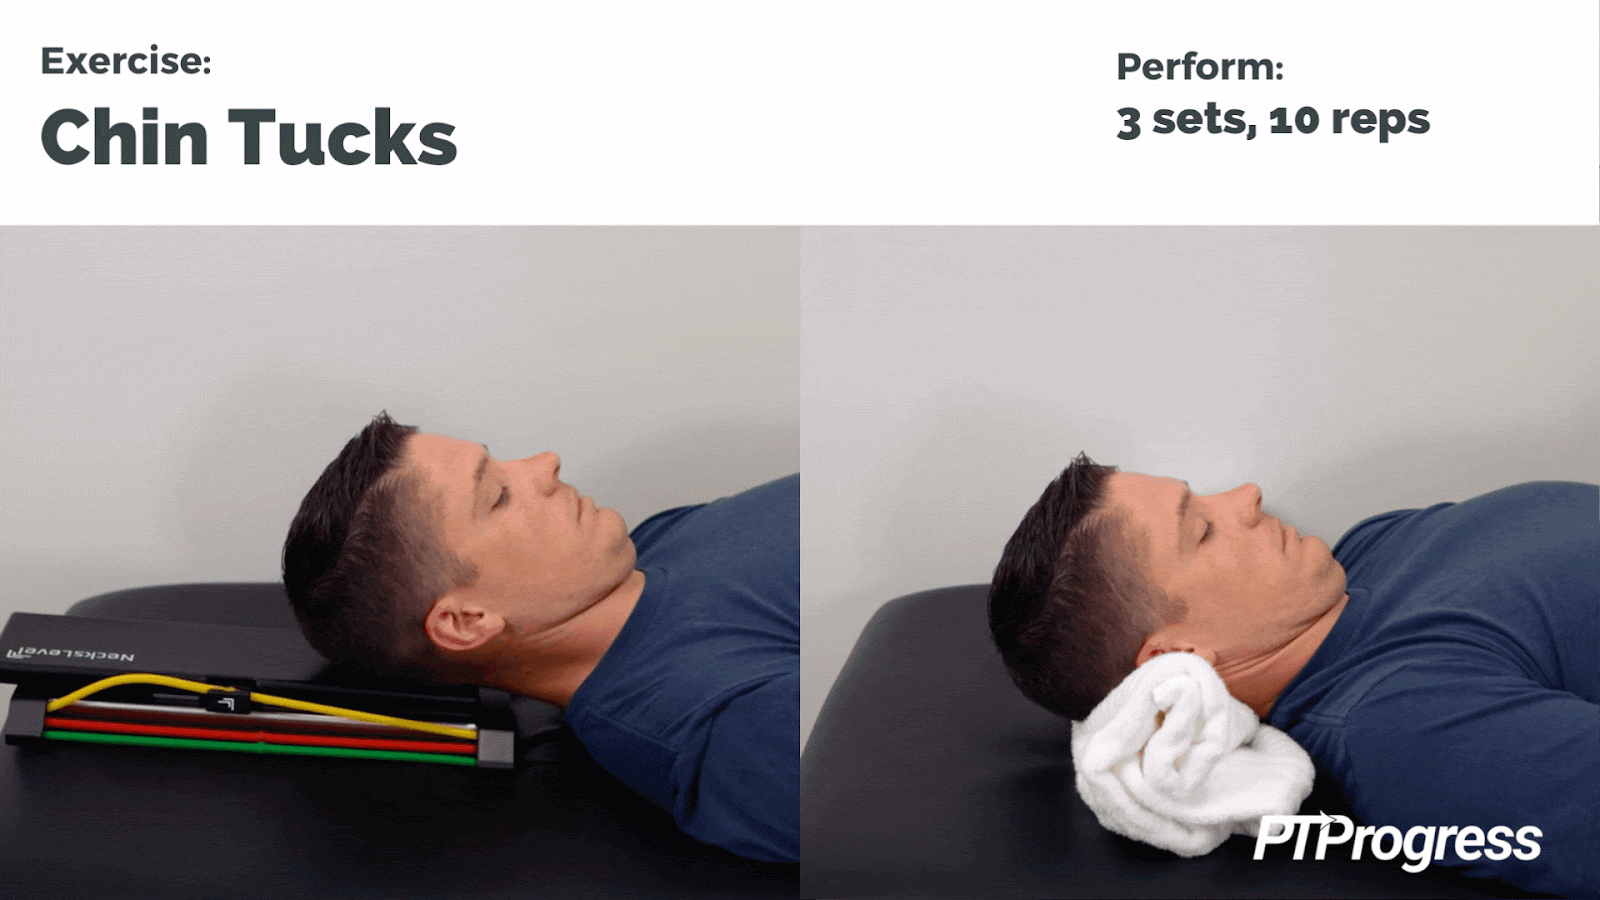
To perform a chin tuck, lower your chin to your chest without lifting your head from the ground. Try pressing the back of your head into the towel or Glide as you tuck your chin. Your goal is to give yourself a double chin—not permanently of course!—and to stretch the muscles along the back and top of your neck near the base of your head. After a brief pause, relax your neck and return your chin to neutral before repeating the movement.
With the NecksLevel Glide, start by performing these chin tucks without resistance, evenly gliding the board from bottom to top as you tuck and untuck your chin. Later you can add and increase resistance by switching on a resistance band. Aim for 3 sets of 10 reps of chin tucks.
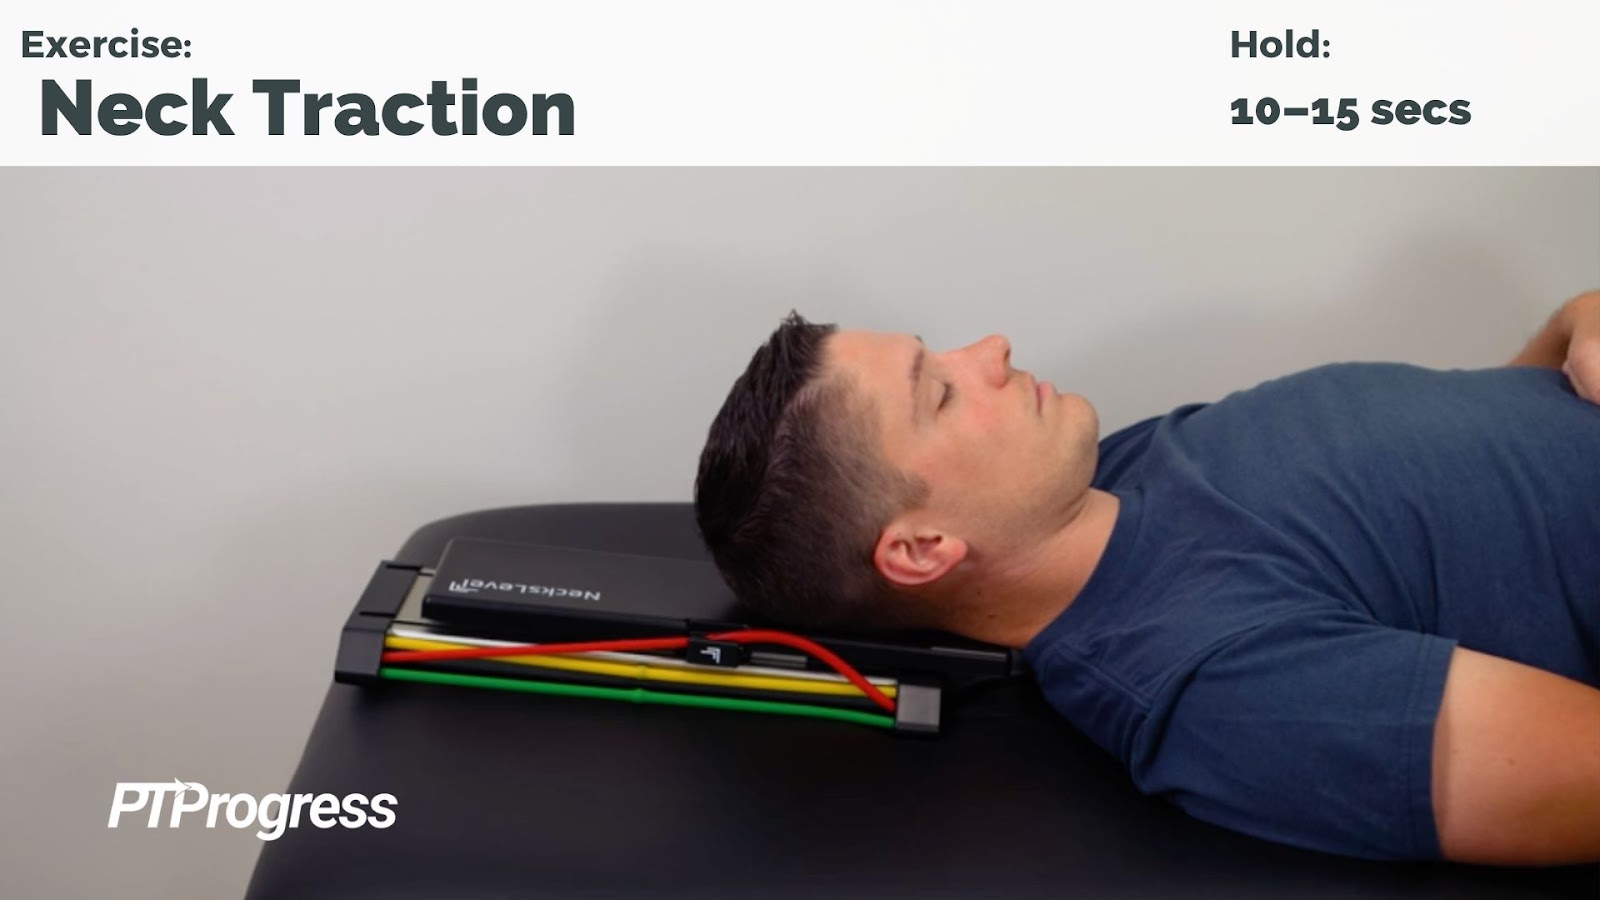
5. Neck Traction
Traction serves to decompress the muscles in the spine, and it can be a great way to relax the neck muscles when they’re fatigued or stiff. Adding a little traction to the end of your neck routine can ensure the muscles don’t stay tight and tense from your workout.
An easy way to perform traction is using the NecksLevel board. Position it lengthwise under your head, as you did for the chin tucks above. This time make sure you hook a resistance band in place—try level 2 or 3. The band will help pull the base of your head up and encourage longer traction.
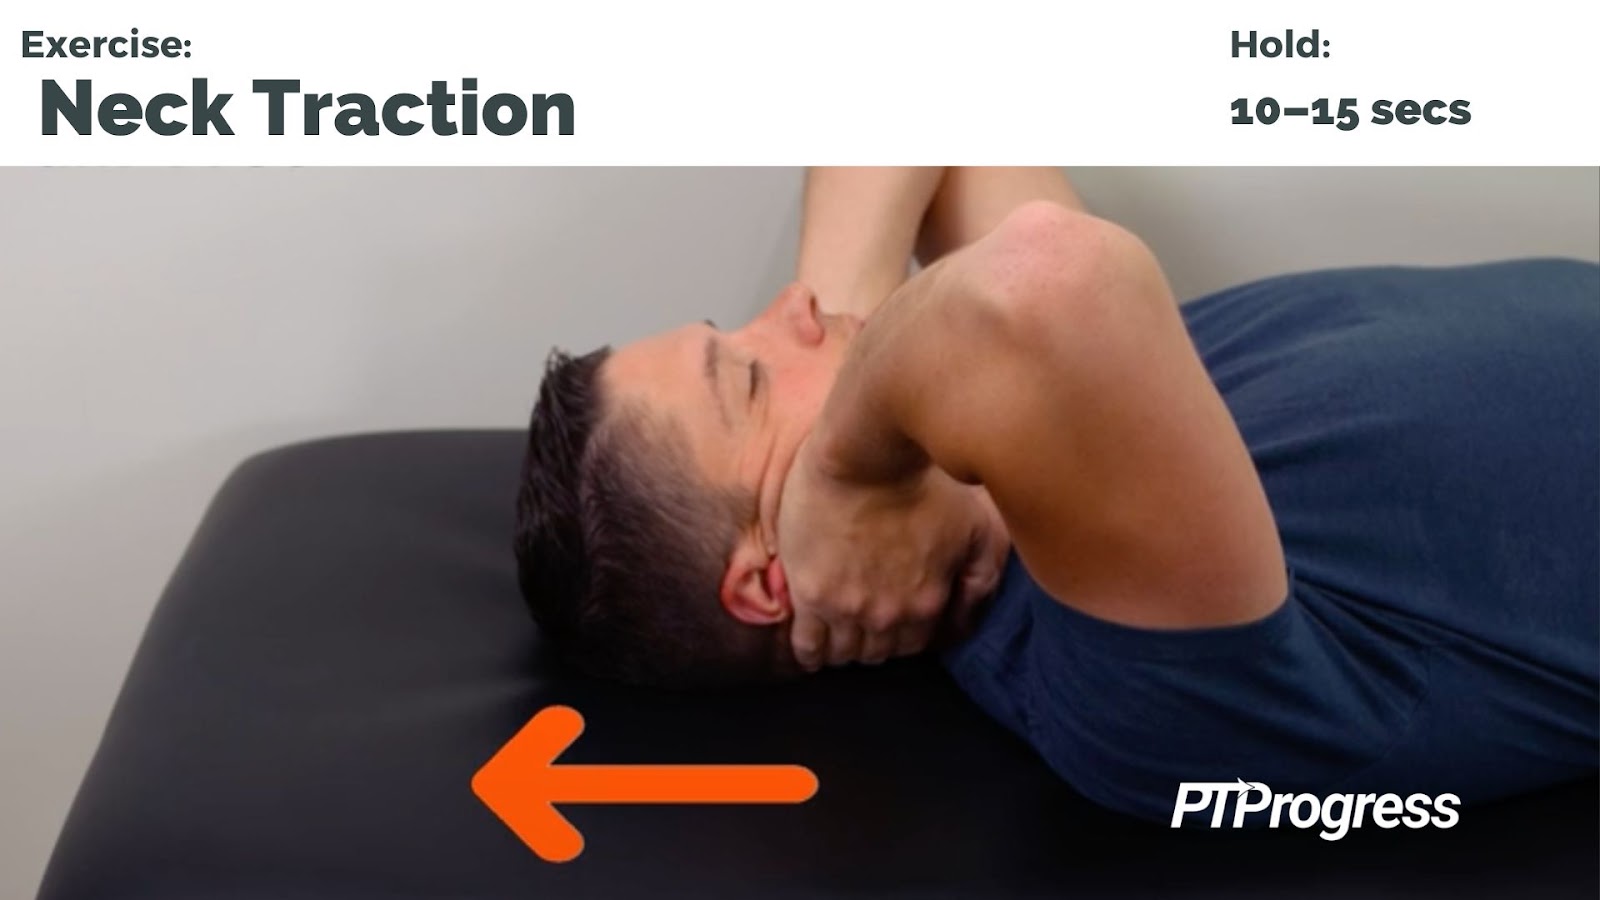
If you don’t have a NecksLevel Glide, lie on your back with your head directly on the surface beneath you—no pillow or towel this time. Cup your hands so they wrap around the nape of your neck, just under your skull. The base of your hands should rest along your jawline. From here, gently pull on your hands up towards the top of your head, as if you’re trying to lengthen your spine. You should feel some pressure release along your neck. Hold for 10–15 seconds at a time, or longer if it feels good.
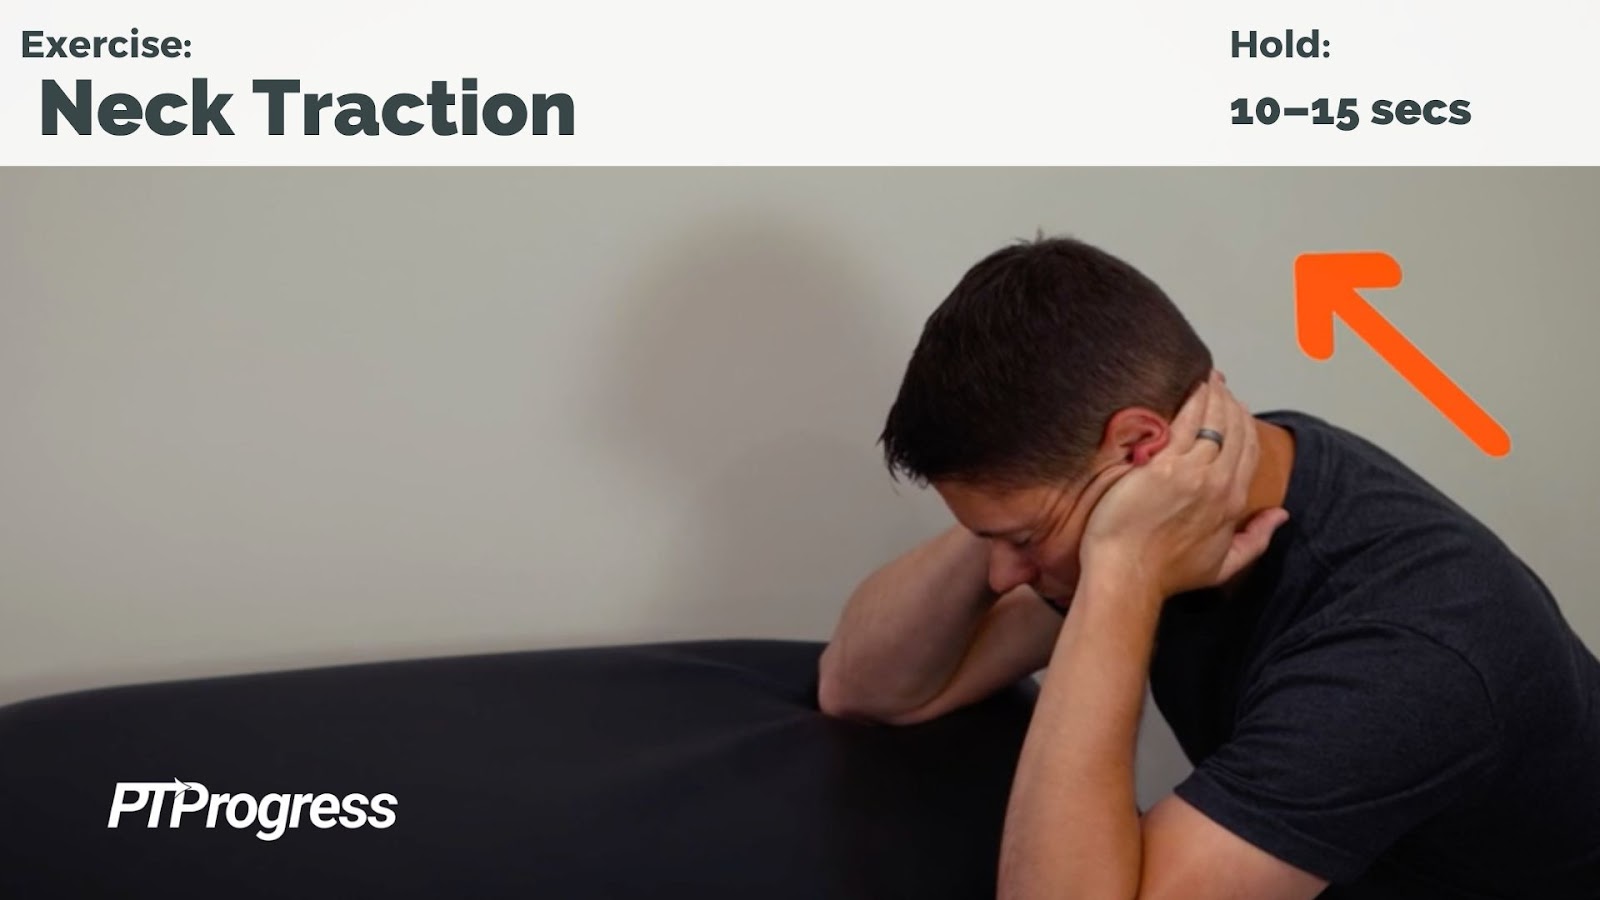
Finally, you can also perform neck traction while sitting at a table or countertop. Rest your elbows on the counter, towards the edge, and wrap your hands around the base of your head as described above. Next, sink downward as your hands pull up along your neck towards the ceiling, as if you’re trying to make yourself taller. Hold for 10–15 seconds, then release.
Whichever version of traction you prefer, try to perform this gentle decompression technique throughout the day to relieve any lingering soreness in your neck.
Conclusion: A Word About NecksLevel Glide
These 5 simple techniques helped me get rid of my neck pain in a matter of days. Altogether, the routine takes just 5 minutes to perform but has long-lasting benefits for neck stiffness and pain. If you’re prone to holding tension in your neck or often wake up with neck stiffness and headaches, then this routine will be a lifesaver!
Personally, my neck feels completely different from two weeks ago when I began this routine. A large part of my success, however, I attribute to the NecksLevel Glide, which made articulating these movements controlled, precise, and tension-free.
If you’re interested in checking out the NecksLevel Glide, you can read my full (unpaid for, entirely unbiased!) review here. It’s not cheap, but it costs half the price of many other neck rehab tools, not to mention the accumulated costs of repeat trips to the PT clinic or chiropractor.
The NecksLevel Glide is a serious piece of rehab equipment, and many PTs—even those of professional athletes!—now use this very device for neck rehab. Being able to have one of these tools in your home means you save time waiting to see a chiropractor or PT and can address your neck pain yourself, right when it starts.
Check out the NecksLevel Glide here and get a discount when you use the promo code PTPROGRESS.